Overview
The WooCommerce Reverb extension allows you to manage your products & inventory in WooCommerce and automatically sync with your Reverb account.
Installation
To install and activate this extension:
- Go to your Order Email or My Account Dashboard under the My API Downloads section.Click the Download link to download the plugin .zip file to your computer.
- Go to: WordPress Admin > Plugins > Add New to upload.
- Click Upload Plugin at the top.
- Click Choose File and select the .zip file you downloaded in step 1. Select Choose.
- Click Install Now.
- Activate the plugin.
Activate your Subscription Key
![]()
To activate your key:
- Log into your My Account.
- Go to My API Keys to copy the key.
- Go to: WordPress Admin > WooCommerce > Settings and select the Reverb tab option to enter your License key and License Email.
- Click Save Changes to activate your license.
If you have successfully activated your license, you will get the following confirmation:
![]()
Note: You must have WooCommerce installed on your site in order to use this extension. If you do not, you will get the following message:
![]()
You need to have an activated key for your plugin or extension to receive two things:
-
- One-click updates of the plugin/extension
- Support for the plugin/extension through our Help Desk
Setup & Configuration
Reverb Account Authorization
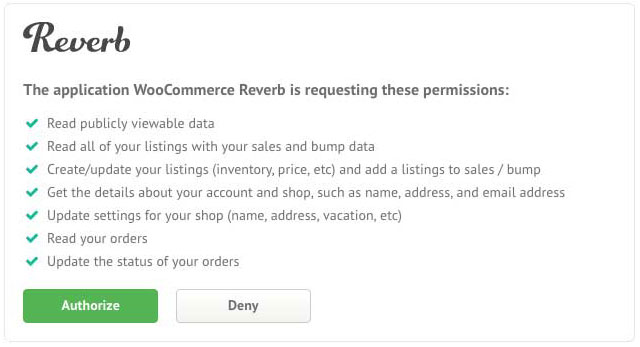
To authorize your Reverb account to communicate with your WooCommerce store through the extension:
- Under WooCommerce > Settings, select the Reverb tab and login to your Reverb account by clicking on the button.

- Authorize your Reverb account to work with the WooCommerce Reverb plugin by clicking on the Authorize button.
Global Settings
Under WooCommerce > Settings, select the Reverb tab and choose the Global Settings link.

Field Sync Settings
Under WooCommerce > Settings, select the Reverb tab and choose the Field Sync Settings link. To modify what fields you wish to have directly synced from your WooCommerce products to Reverb products, adjust the field sync settings appropriately.

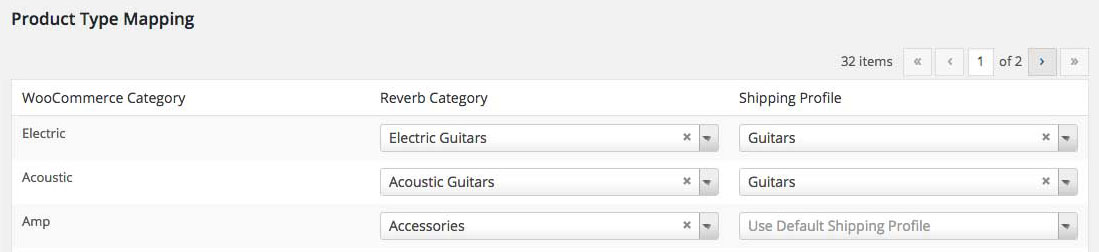
Product Type Mappings
Under WooCommerce > Settings, select the Reverb tab and choose the Product Type Mappings link. From here you can assign which Reverb category is related to which WooCommerce category as well as what Reverb Shipping Profile to use for that category.
Deactivate Plugin License
Under WooCommerce > Settings, select the Reverb tab and choose the Deactivate Plugin License link. Check the box to deactivate your license and click save changes.
![]()
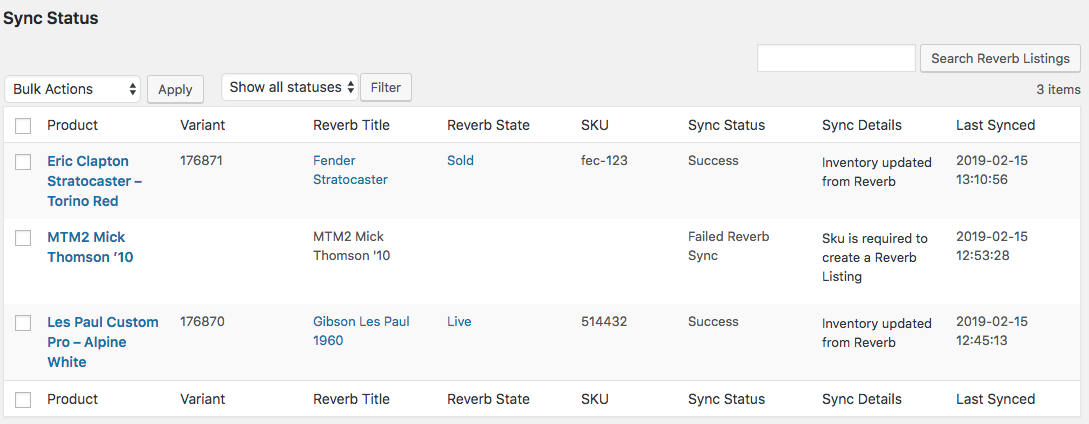
Sync Status
Under WooCommerce > Settings, select the Reverb tab and choose the Sync Status link. The list provided will show you all of your WooCommerce products which you have selected to Sync with Reverb and their current status.
How to Sync a Product with Reverb
Under WooCommerce > Products, select a product to Add/Edit. Under the Product Data > Reverb Tab on your products page, you can choose to Sync your product with Reverb and enter in any additional field information for Make, Mode, Condition, Finish,Year or Seller Cost. You may also choose to show the Accept Offers option for our Reverb product.

Quick Edit Product Reverb Information
Under WooCommerce > Products, in the list provided, you can choose to Quick Edit a specific product and it will allow you to manage the sync with Reverb as well as the product specific information for Reverb.
Troubleshooting
If you’re experiencing issues with this extension, please checkout our frequently asked questions. If you still need assistance, feel free to contact our support team.